3D Printing – Edge Lit Acrylic Project


Printing 

a) download the model file here

b) save the model file (it’s in your downloads folder) to your project folder in your personal drive location

c) Locate the slicing program Cura on your computer.  It is within a folder called ‘Ultimaker Cura’.  Open the program.

d) Select the printer you intend to use.  We have three printer options in the room:

d) Within Cura, open the model file from your saved location

e) Rotate the model so as to best position it to print.  Consider how a 3D printer builds the print.

d) Make any setting adjustments necessary.  If using a Printrbot Play you will need to adjust the printing temperature as the default is too low.  Set this to 215 degrees.

f) ‘Prepare’ (slice) your model file.  Take note of the estimated print time.

g) Save the prepared file to an SD card (you will need a ‘USB card reader’ )

h) If using the Monoprice mini the card can now be inserted into the printer.  If using a Printrbot Play the file that you intend to print will need to have it’s name changed to ‘auto0.g’ prior to the card being inserted into the printer.

3) Printers are both expensive and delicate.  Please ask for assistance if unsure how to use any of the printers.  Mistakes can often lead to costly and time consuming repairs 🙁


Soldering the Components

Soldering Tips/Considerations

  1. Safety – eye protection, smoke eaters, do not touch hot things (put soldering iron back in the holder immediately after use)
  2. Identify the cathode (negative) lead of your LED and solder to the negative lead of the battery clip (reversing an LEDs polarity will stop current flow and your LED won’t light)
  3. Soldering the push button switch terminals will be challenging.  Take care not to ‘bridge’ the terminals, this will prevent the circuit from being able to be switched off)
  4. Never solder on a powered circuit (the battery must be removed when soldering components)
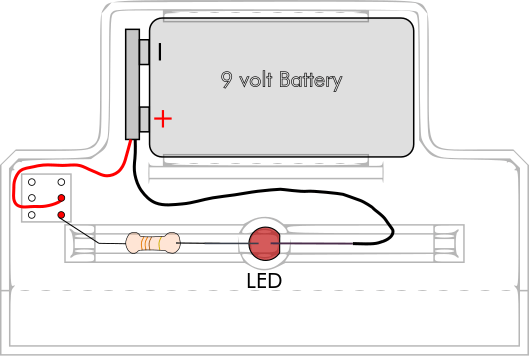
 

Wiring Diagram


To Do List

Robotics 8  – To Do List

  1. Complete Fusion 360 Tutorials
  2. Design the insert for the edge lit acrylic project – see instructions posted on class website
  3. Solder Mr./Ms. Resistor (eye protection, don’t touch hot things, use smoke eaters)
  4. 3D Print the base for the edge lit acrylic project (sign up list on white board at front of the class)
  5. Done everything, or line-ups in your way, see me for what to do next.

Video Tutorials


Ezra & Joah – How to turn a 2D image into a 3D object.


Dawson & Rowan – How to Make an Blinking LED Circuit – Simple Tutorial for Beginners


Crystal & Jaycen – How to Make a Dice Inside of a Dice


Tengis & Owen – How to make a 10 LED Chaser Circuit


Andrew & Evan – How to make the Black Box from TF2


Ethan P. – How to 3D Print Blender Models


Zephyr & Ethan A. – 


Lucas Rye – How to 3D print an object from Thingiverse


Blog Posting Marking

Grade value for blogs:

  • Year 1 – 25% of overall grade
  • Year 2 – 30% of overall grade

Daily blog entries are assessed based on the extent to which the following three criteria are met:

  1. Documentation –  describes the ‘what’ with respect to time spent learning.  What, exactly, did you do?  A successful strategy here is to keep your blog open and make an entry at regular intervals throughout the class.  Some students even choose to ‘time stamp’ their entries.  Making periodic entries at regular intervals during class also helps you to appreciate whether or not your time is being well spent, ie, “what did I just do for the past 15 minutes?”.
  2. Evidence – This supports the ‘what’ that you are describing in your documenting of your learning experience and involves the inclusion of media to support your claims.  Examples of media could be, pictures, video, audio, and links to resources consulted.
  3. Reflection – Likely the most challenging component of your blog, here you are being asked to stop and think about what you are doing/learning, and articulate your thoughts surrounding what you are doing/learning.  Describe what you have learned, taken away, from the time you have spent.  A goal here would be to convey that you are actually learning and moving your knowledge/experience forward; not merely being satisfied with status quo (the existing state of affairs).